I'm really starting to love sushi rolls. Making your own doesn't have to really be that complicated. I don't eat the raw fish variety, but I do love the veggie rolls, tempura and all the asian flavors. I am not ever going to claim to have the best sushi rolls around nor will I say I'm great at making them. However, I am pretty excited that I tried to make my own sushi rolls and it wasn't nearly as difficult as I thought it would be and they tasted pretty darn good. I haven't tried making any of the really fancy kinds, but basic veggie with some “krab” has been tasty enough for me to enjoy sushi rolls as a home made lunch once in a while. I'll tell you how I did it…
I haven't completely gotten a hang of what kind of rice to use. I did fine some rice at the grocery store labeled “sushi rice”, however, I prefer to buy rice at Sprouts grocery store in the bulk section… I'm working on that.
Ingredients and supplies you need:
- Nori – it's dried seaweed paper kind of and comes in a package with multiple sheets
- Sushi rice
- Rice vinegar (or see below for an alternate using white vinegar)
- Sugar
- Steamed carrots
- Cucumbers
- Crab (or “krab”, fish meat)
- Avocado
- A bamboo rolling mat – I have little bamboo placemats I got at the Dollar Tree that work great!
How to make simple sushi rolls:
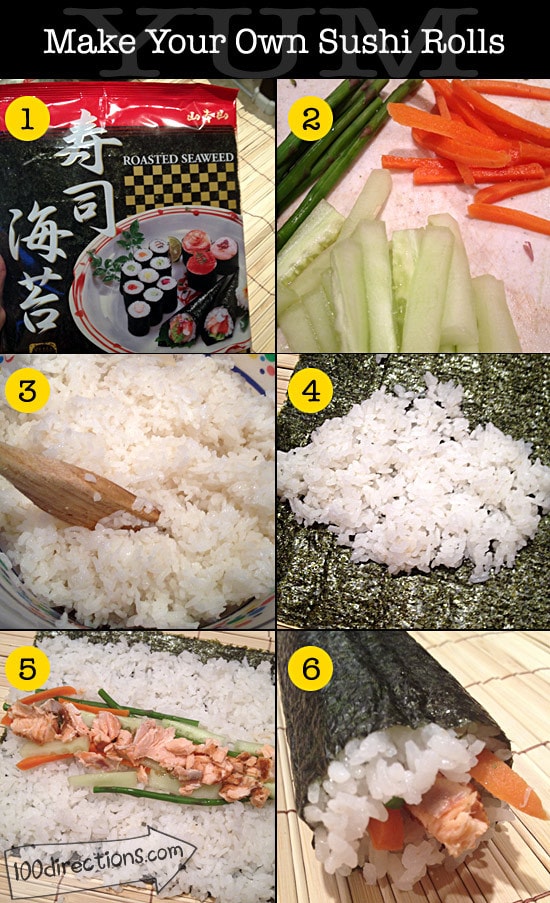
Prepare your rice:
I use a rice cooker that cooks both my rice and steams my veggies at the same time – I highly recommend it!
- Cook the rice then add 1/4 cup rice vinegar and 1/2 tablespoons of sugar.
- If you don't have rice vinegar, make a 3:1 ratio of white vinegar and water, then use 1-2 tablespoons of sugar instead of the 1/2 tbs.
- Let cool a little before using, however, the rice seems to spread easier when it's warmer.
Prepare filling ingredients:
- Cut all your ingredients into slices so they sit nicely inside each individual sushi roll serving. I use baby carrots and cut into 2-4 slices per. About 1/2″ thick slices seem to work well.
Make your sushi rolls:
- Place the nori on the mat, shiny/smooth side down – some nori has perforations in it to show you where to cut, check for this to know which way to place the nori on your mat. You should be rolling the wide side horizontal… as in it should be wider than it is long when rolling.
- Put rice on the nori, leaving about 3/4″ free of rice at the end furthest from you.
- Place your filling ingredients horizontally down the middle of the rice.
- Roll the mat as if you are rolling up a poster or a sleeping bag, tucking a bit as you go. I find that I usually end up with a little funky dent where the ends meet, however, after I get it rolled, I pull on the mat and gently squeeze the entire roll to firm up the roll a bit.
- Remove the sushi roll from the mat and using a sharp nice carefully cut into individual servings. Chill if desired.
Enjoy!
More Resources for making your own sushi rolls:
- Sushi Roll Ideas on Pinterest – all kinds of different rolls, information about sushi roll making and tutorials
- How to make a California sushi roll – a great video showing how to make a California style sushi roll. This video does a good job of showing how to roll and tuck your sushi roll with the rolling mat.
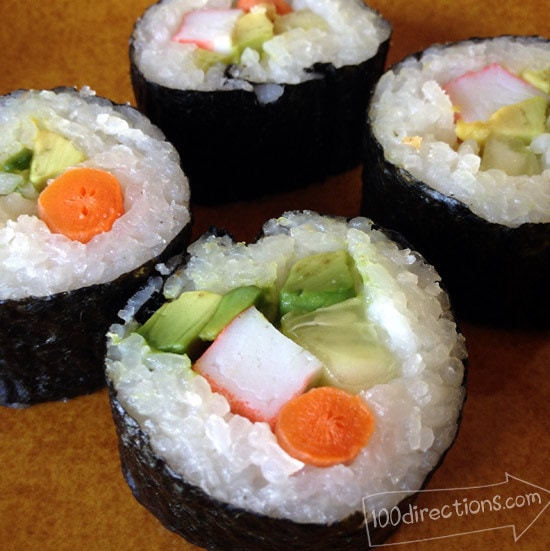
Do you make your own sushi rolls? If you have any tips or secrets for success you'd like to share, I'd love to hear about it. The above photos are from 2 different sessions of making sushi rolls. The first round was asparagus, cucumber, carrots and cooked salmon. I'm not a fan of raw fish, but I love love cooked salmon so I cooked a filet and used that in the rolls. The second round of sushi rolls I actually liked better. They had cucumber, steamed carrots, avocado and fake crab. The flavor was crisp and sweet and oh so yummy! Stop by and tell me if you try to make your own sushi rolls after reading this tutorial.


This makes it seem so easy! I assume the sushi rice is much stickier than regular white rice..? My daughter loves going out for sushi with me (yes, she is 2 – she has expensive taste, lol) so if I could make it at home she would just be in heaven. Thank you for sharing this with Delicious Dish Tuesday!
Hi Amanda, I’d love to hear how your sushi rolls turned out. Yes, the rice used is definitely stickier than regular rice, however the vinegar mixture adds to the stickiness too.
I have been wanting to try to make these! Thanks!
I love veggie sushi too. I’ve always been so intimidated at the thought of making my own. Thanks for taking some of that fear away!
Lori, that sounds like a great mother/daughter activity! Tip of the day: take your time rolling. Last night I made some and 1/2 fell apart because I was in a hurry and stuffed them a little too full to stay together – oops!
This is something my daughter and I would like to do together. You make it seem manageable!
I have never made sushi, and your blog post is totally making me want to try this now! Thank you!!!
Good luck, tell me how it goes. I was really thinking they would be much more difficult to make. I haven’t tried the more advance versions, just this simple flavor combo, but we love sushi rolls but they are too expensive to eat all the time… this is my way of justifying eating them more often 😀
This seems so easy! I may have to try it. Thanks for sharing Jen!
I’d love to hear how it turns out for you!
The next time I have some leftover rice I’m going to give sushi rolls a try. I always have the veggies on hand – but this could even work with canned chicken or tuna in a pinch. TFS!
Fantastic! Make sure you are using “sticky rice” when or your sushi rolls will fall apart. The vinegar and type of rice make a big difference. From what I’ve discovered, the rice vinegar is a little sweeter than standard white vinegar, thus the need for sugar to give the rice that yummy sushi flavor we love.
Awesome! I ment to make some for lunch today but got side tracked painting a project, do you have any left to share? 😀
I think you’ve twisted my arm into making sushi 😉 TFS!