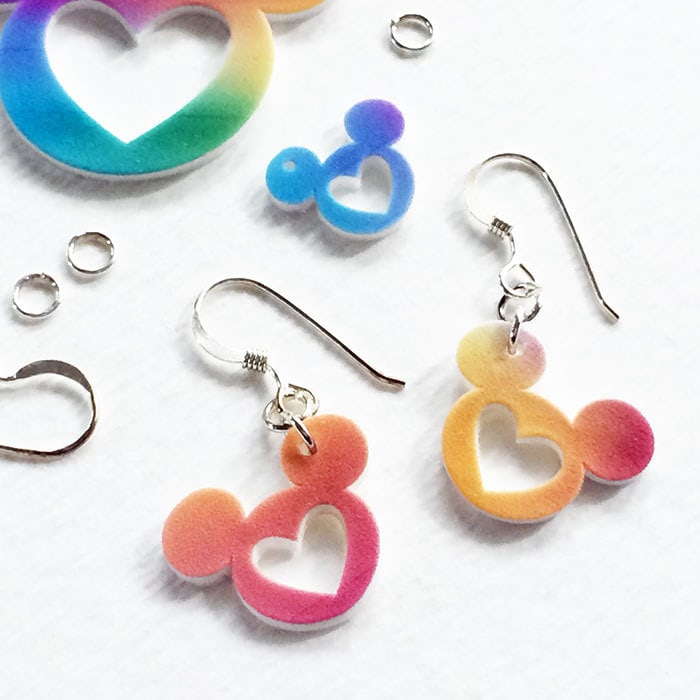
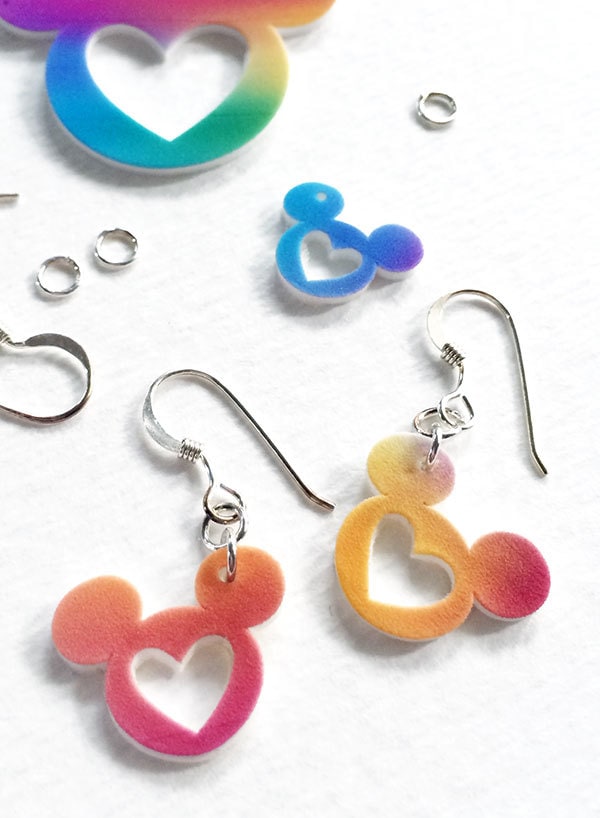
today I'll show you how to make your own cute little DIY Disney Jewelry Disney inspired Love Mickey Mouse earrings. Did you know you can make jewelry using shrink plastic and your Cricut?
Better yet, did you know you can cut shrink plastic with your Cricut machine?
Oh Yes you can! I designed a rainbow colored printable I used and you can download and use it too.This is a fun Cricut project you can make over and over! The coolest thing about shrink plastic is watching it shrink! I tried to take a little video to show you… but filming through the oven door was impossible and trying to film with my camera in my hand, in the oven was a little too hot. Go figure.
Make your own Disney Jewelry
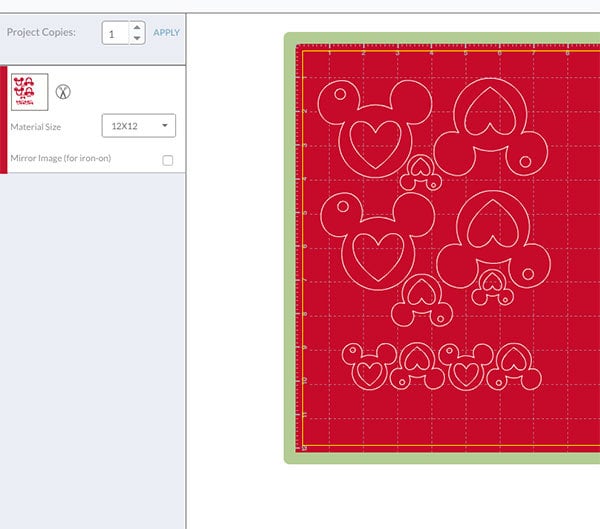
Using your with Cricut and a free rainbow printable I designed, you can make these cute Mickey Mouse earrings. I created a variety of sizes to try out for this project, so some of my examples show small earring sided cut outs and larger pieces on the same work space. Play with sizes to see what you like best.
Tip: before you cut out the shrink plastic, print the rainbow art on cardstock or paper and test your cuts so you know if they are cutting the sizes and placement you'd like.
Materials you need:
- Cricut Cutting Machine (Explore, Air or Explore One)
- Cricut Design Space free online software
- Disney Mickey head cut file (image #M4008B)
– I created a custom layout of this Mickey Ears design, you should be able to start your project from here. - Heart shape cut file
- Printable shrink plastic
- Rainbow Art page designed by Jen Goode (download below)
- Parchment paper, cookie sheet and hot pads
- Jewelry findings for earrings – I used a hook and jump ring
- Jewelry pliers
- Sealer – optional but recommended
This DIY Disney jewelry project is pretty simple to create, especially if you are already familiar with Cricut Design Space. You can get the Mickey ears design right from Design Space and use my own rainbow print to get the color design I'm using.
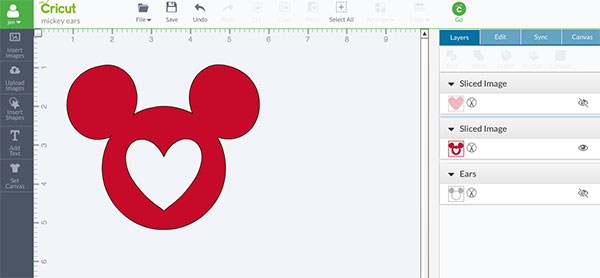
To create the Mickey heart design in Cricut Design Space
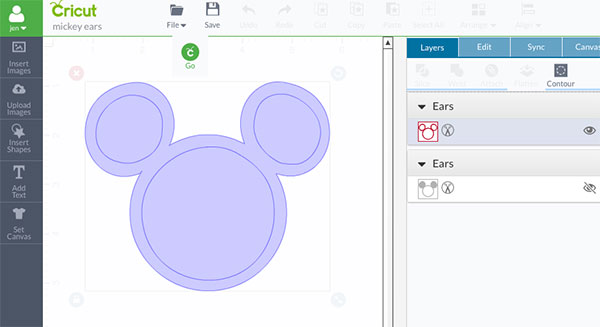
- Select the outlined Mickey head from the Cricut design library.
- Ungroup the design.
- Click Contours. deselect the inside circles of the Mickey design. This will create a Mickey cut file as a solid shape.
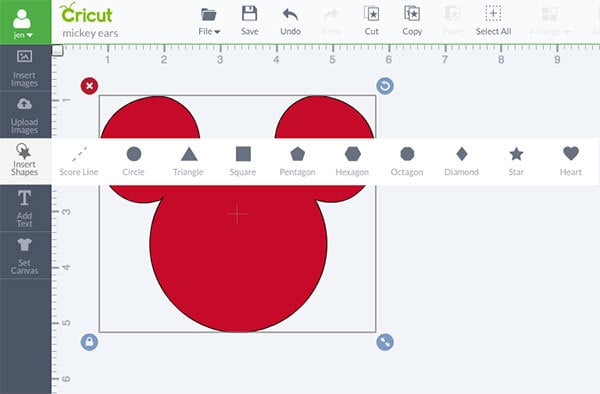
- Add a heart shape from the “shapes” menu on the left of Design Space.
- Place the heart in the center of the Mickey head. Select everything and click slice. This will cut out the heart shape from the Mickey head and leave a cut out shape of the heart as well. Hide the heart by clicking the eye icon on the layer pallet.
- Repeat step #5 with a circle to create the jewelry circle in each piece.
For the earrings specifically, I cut the original size to at about 1.25″ tall. The shrink plastic will shrink about 50% it's original size.
Steps to make your own Disney Jewelry:
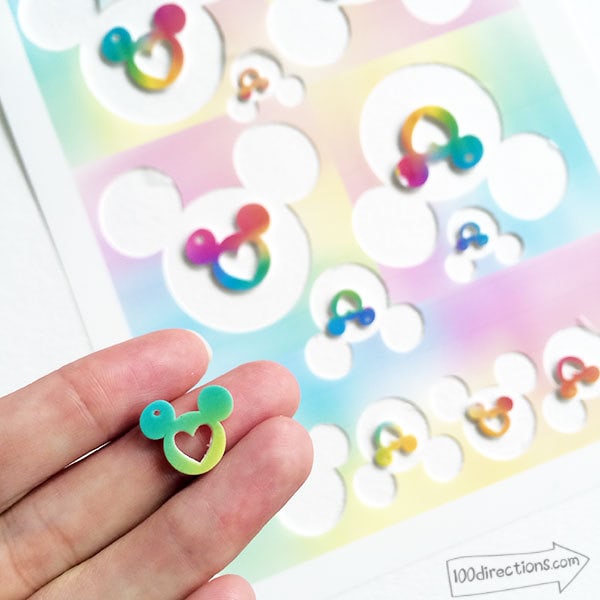
- Download the rainbow art (below).
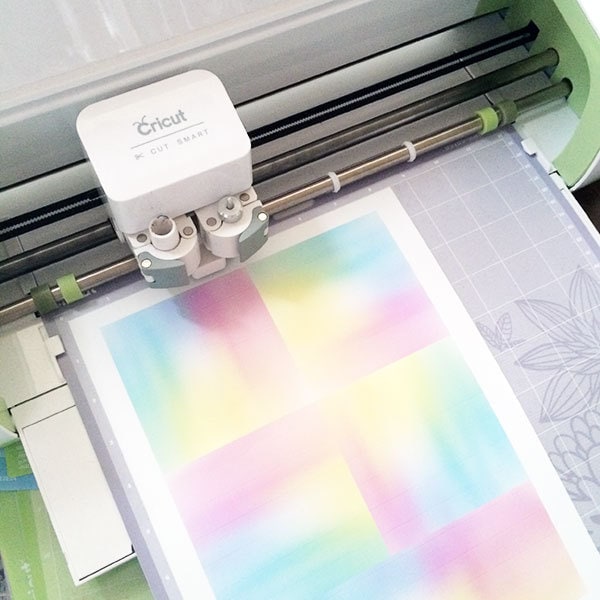
- Print rainbow art on printable shrink plastic
- Set up the cutting design you'd like in Cricut Design Space. Line up the cut designs with the placement of the color blocks on your printout. Just measure the placement on your printout and then align the cut lines on the virtual mat in Design Space.
- To cut the shrink plastic you need to just the shrink plastic through repeated cuts. I did 3 cuts at the cardstock setting and then 2 cuts at the poster board setting. The cut pieces then need to be carefully removed. Using the weeding tool is helpful, just be careful not to tear the plastic.
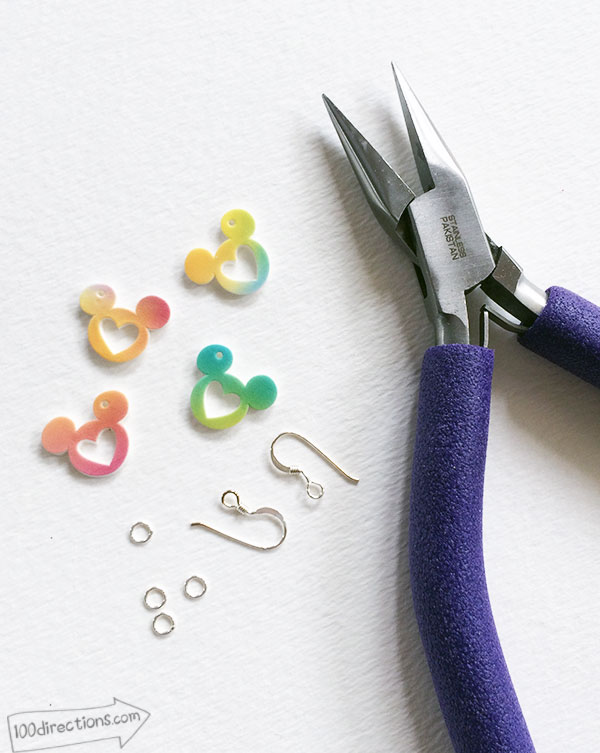
- Once you have all your plastic cutouts removed, place on a parchment paper lined cookie sheet and back for 5-10 minutes until completely shrunk down. You'll know the shrinking is finished when the plastic is no longer bent, smaller but flat. Remove from oven and allow to cool.
- Add the jewelry findings to create earrings.
- Optionally apply sealer to both sides of each earring. I really like the Decoart brand Triple Thick. When it's dry it looks like a resin, high shine finish… very pretty.
Tip: to ensure your plastic is as flat as possible, place a piece of parchment paper on top of the plastic pieces as soon as you remove it from the oven and press down using a hot pad. Do not use your bare hands, you will burn them!
Make your own Mickey ears earrings with a pretty rainbow pattern. Below you will find a free rainbow art download you can make this cute DIY Disney jewelry set. Get the full supply list here and read the step by step instructions here.
Download the free rainbow art printable to use in your own Disney jewelry project!
Rainbow Art
FREE
You can use this printable for all kinds of projects. It also coordinates great with the rainbow party accessory printables. Have fun with it!
Here are even more Disney project ideas you can make with your Cricut machine. Check out the list below and just click the links to see each project.
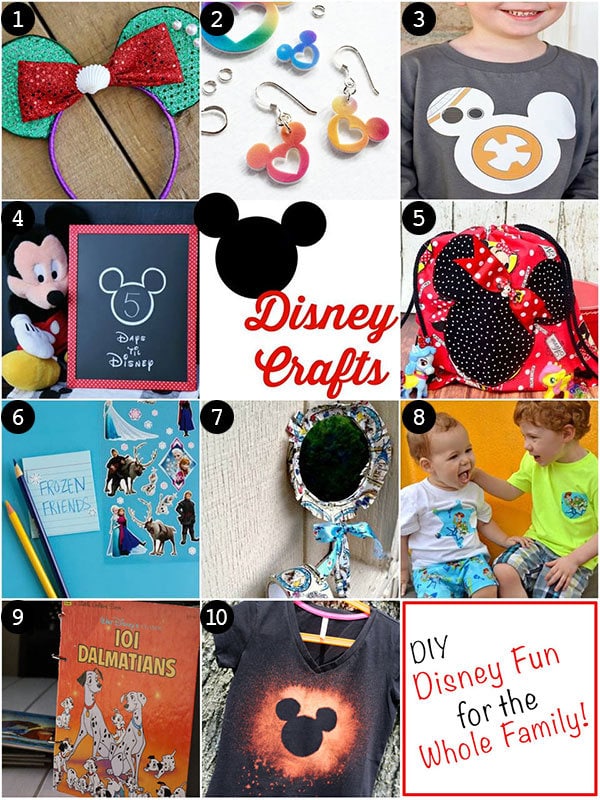
More fun Disney Crafts with your Cricut
- Little Mermaid Ears by Vanessa Coppola from See Vanessa Craft
- Rainbow Mickey Earrings by Jen Goode (That's Me!) 100 Directions
- BB-8 Shirt by Karen Heffren DIY from Desert Chica
- Disney Trip Countdown – DIY Washi Tape Chalkboard by Sara Wellensiek from Mom Endeavors
- Disney Drawstring Backpack by Laura Petersen from Pink Cake Plate
- Disney Sticker Story Starters by Marie LeBaron from Make and Takes
- Disney Princess Duct Tape Hand Mirror by Heather Mann from Dollar Store Crafts
- Custom Toy Story Shorts and Shirts by Kelly Denton from Eclectic Momsense
- DIY Disney Autograph and Activity Book by Sara Blake from Clever Pink Pirate
- Bleached out disney t-shirts for the not-so-crafty crafter by Amy Mascott from Teach Mama
Spread a little Disney Magic and share the fun with your friends. I'd love to hear what Disney crafts you're making!


OMG soooo cute!!
Thank you!!